This handwritten digit classification task makes use of neural networks (ANN) to create a model on MNIST dataset to recognize digits from 0 to 9. In this article we’ll make use of keras library from tensorflow to complete this task.
Overview
In the realm of machine learning, one of the fundamental tasks is recognizing handwritten digits. This seemingly simple task holds immense importance, serving as the cornerstone for more complex image recognition and classification problems. In this article, we’ll delve into the world of handwritten digit classification using Artificial Neural Networks (ANN) and the renowned MNIST dataset, showcasing how Keras, a powerful library for building neural networks, can be utilized for this purpose. You can access the dataset here. Keras already have this dataset in it, so there is no need to access it from anywhere.
What is Handwritten Digit Classification
Handwritten digit classification involves training a model to recognize digits (0-9) from images of handwritten digits. Each image in the dataset represents a single digit, and the goal is to correctly predict the digit depicted in the image.
What is MNIST Dataset
The MNIST dataset is a collection of 28×28 grayscale images of handwritten digits, along with their corresponding labels (digits 0-9). It consists of 60,000 training images and 10,000 test images, making it an ideal benchmark for evaluating the performance of machine learning models.
Building the Artificial Neural Network with Keras
Using Keras, we can easily construct an ANN for handwritten digit classification. The following steps shows the process:
- Data Preparation: Load the MNIST dataset and preprocess the images by scaling pixel values to a range of 0 to 1.
- Model Architecture: Design the architecture of the neural network. For this task, a simple architecture comprising input, hidden, and output layers suffices. We’ll use densely connected layers (also known as fully connected layers) with appropriate activation functions.
- Compilation: Compile the model by specifying the loss function, optimizer, and evaluation metric. For multi-class classification tasks like this, categorical cross-entropy is a commonly used loss function.
- Training: Train the model on the training data. Adjust hyperparameters such as the number of epochs and batch size to optimize performance.
- Evaluation: Evaluate the trained model on the test data to assess its accuracy and performance. This step helps us understand how well the model generalizes to unseen data.
Collect data from keras
import tensorflow
from tensorflow import keras
from tensorflow.keras import Sequential
from tensorflow.keras.layers import Dense,Flatten
(X_train,y_train),(X_test,y_test) = keras.datasets.mnist.load_data()Separate training and testing inputs and bring the values between 0 and 1 range for easy conversion of model weights in future. We can do this by dividing the data by 255 which is total number of pixels.
X_train = X_train/255
X_test = X_test/255
Now lets flatten the data arrays one after the other and add the layers. We have one input layer and one output layer, plus we have two hidden layers. We have used ‘relu‘ as the activation function for hidden layers and ‘softmax‘ for output layer because whenever there is multiple output nodes, we use softmax as activation function.
model = Sequential()

model.add(Flatten(input_shape=(28,28)))
model.add(Dense(128,activation='relu'))
model.add(Dense(32,activation='relu'))
model.add(Dense(10,activation='softmax'))
If we see the summary of our model it shows Trainable params: 104938.
model.summary()Now lets compile our model and train it using fit() method.
model.compile(loss='sparse_categorical_crossentropy',optimizer='Adam',metrics=['accuracy'])

history = model.fit(X_train,y_train,epochs=25,validation_split=0.2)
As you can see while compiling, we have make use of sparse categorical cross entropy as loss function. It will save the time by not performing one-hot-encoding for labels.
We can now predict the test data and check for accuracy score.
y_prob = model.predict(X_test)
y_pred = y_prob.argmax(axis=1)

from sklearn.metrics import accuracy_score
accuracy_score(y_test,y_pred)
The accuracy is coming as 0.9736.
Lets plot the graph to compare loss and accuracy to check for overfitting problem.
plt.plot(history.history['loss'])
plt.plot(history.history['val_loss'])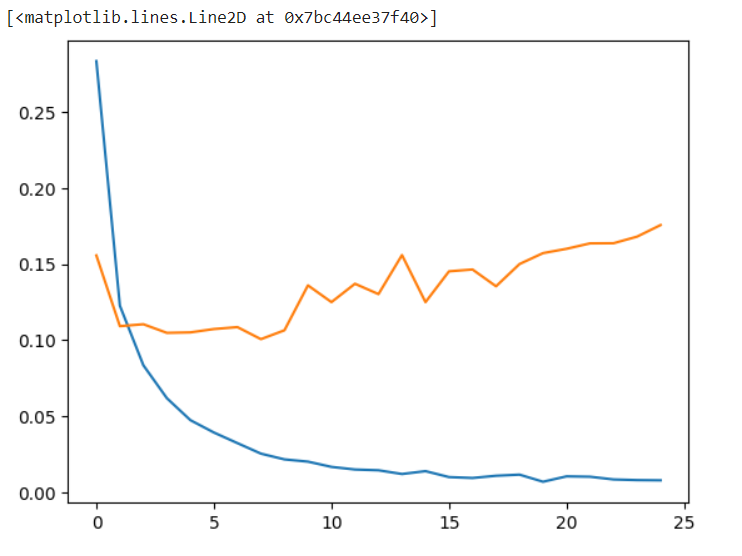
plt.plot(history.history['accuracy'])
plt.plot(history.history['val_accuracy'])
By looking at the graphs, we can say that there is lot of overfitting happening in data. You can resolve this issue anytime by tuning the hyperparameters. Now just check and compare the original digit value and predicted value.
plt.imshow(X_test[1])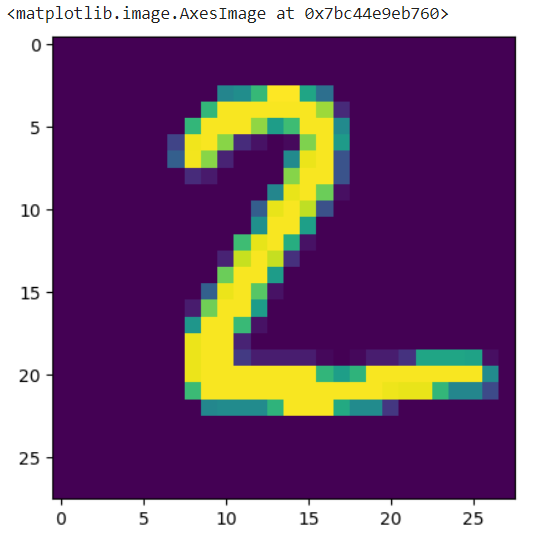
model.predict(X_test[1].reshape(1,28,28)).argmax(axis=1)It is showing the correct results as array([2]).
Handwritten digit classification using Artificial Neural Networks offers a powerful and effective solution to a fundamental problem in machine learning. By leveraging the MNIST dataset and the capabilities of Keras, we can build and train accurate models capable of recognizing handwritten digits with high accuracy. This serves as a stepping stone for more complex image recognition tasks and underscores the versatility and applicability of neural networks in solving real-world problems.
What a fantastic resource! The articles are meticulously crafted, offering a perfect balance of depth and accessibility. I always walk away having gained new understanding. My sincere appreciation to the team behind this outstanding website.
Your articles never fail to captivate me. Each one is a testament to your expertise and dedication to your craft. Thank you for sharing your wisdom with the world.