Power BI allows us for the connection of various relational data sources, essentially databases where information is organized into multiple tables. In each database table, there are several columns, and each row contains specific data entries.
Overview
If your organization utilizes a relational database for sales, Power BI Desktop offers the option to establish a direct connection to the database, eliminating the need for using exported flat files.
This direct connection enables you to closely monitor business progress, discern trends, forecast sales figures, devise budgets, and establish performance indicators and targets. Power BI Desktop is compatible with numerous relational databases, whether they are hosted in the cloud or on-premises.
Let’s take a scenario where the Sales team at Tailwind Traders has requested that you connect to the organization’s on-premises SQL Server database and get the sales data into Power BI Desktop so you can build sales reports.
SQL Database >> Power BI >> Report
Connect to Data in a Relational Database
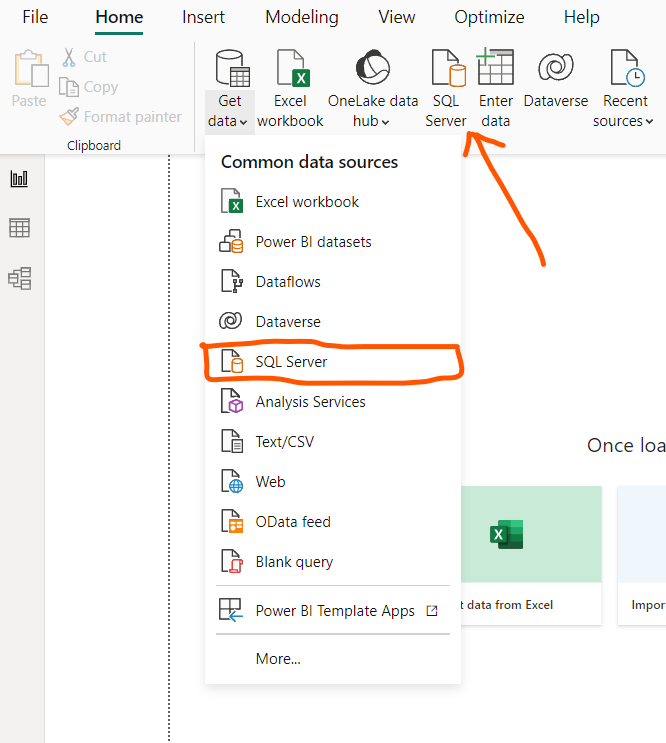
To access data from your relational database in Power BI Desktop, you can utilize the “Get Data” feature and choose the relevant option corresponding to your relational database. In this instance, the SQL Server option is selected, as depicted in the provided screenshot. Adjacent to the “Get Data” button, there are quick-access options for data sources, including SQL Server.
The next action involves entering the database server name and a database name in the SQL Server database window. Within the data connectivity mode, you’ll encounter two options: Import (which is the default and recommended choice) and DirectQuery. Typically, the Import option is selected. While there are additional advanced options present in the SQL Server database window, they can be disregarded for the current configuration.

After you’ve added your server and database names, you’ll be prompted to sign in with a username and password. You’ll have three sign-in options:
- Windows – Use your Windows account (Azure Active Directory credentials).
- Database – Use your database credentials. For instance, SQL Server has its own sign-in and authentication system that is sometimes used. If the database administrator gave you a unique sign-in to the database, you might need to enter those credentials on the Database tab.
- Microsoft account – Use your Microsoft account credentials. This option is often used for Azure services.
Select a sign-in option, enter your username and password, and then select Connect.
Select Data to Import
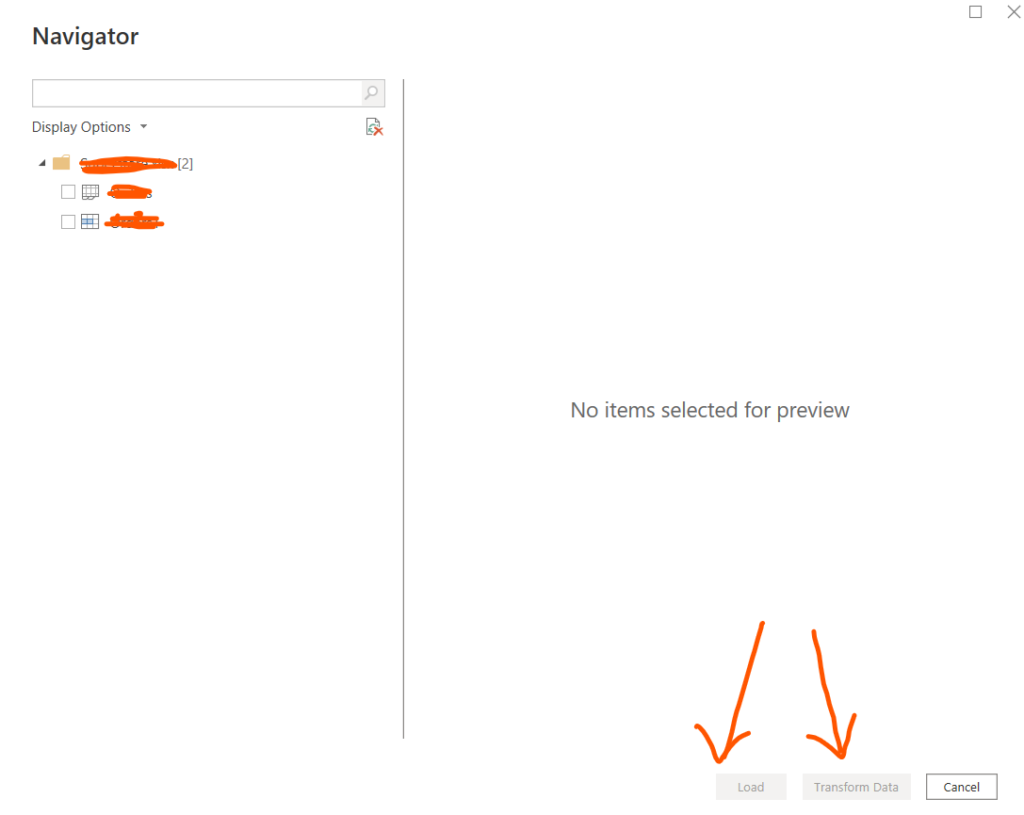
Once the database is successfully connected to Power BI Desktop, the Navigator window showcases the available data within your data source, which, in this case, is the SQL database. You have the option to choose a table or entity, preview its contents, and ensure that the accurate data will be loaded into the Power BI model.
Select the checkbox(es) corresponding to the table(s) you wish to import into Power BI Desktop, and then proceed by choosing either the “Load” or “Transform Data” option.
- Load – Automatically load your data into a Power BI model in its current state.
- Transform Data – Open your data in Microsoft Power Query, where you can perform actions such as deleting unnecessary rows or columns, grouping your data, removing errors, and many other data quality tasks.
Import Data by Writing an SQL Query
An alternative method for importing data is by writing an SQL query to specifically outline the tables and columns required.
To compose your SQL query, navigate to the SQL Server database window, input your server and database names, and then click the arrow adjacent to “Advanced options” to reveal additional settings. Within the “SQL statement” box, formulate your query statement, and then click “OK.” In this illustration, the Select SQL statement is employed to load the ID, NAME, and SALESAMOUNT columns from the SALES table.

Write an SQL Statement
As mentioned earlier, you have the option to import data into your Power BI model by utilizing an SQL query. SQL, or Structured Query Language, is a standardized programming language employed for managing relational databases and executing various data management operations.
Imagine a scenario where your database contains an extensive table encompassing sales data spanning several years. If, for instance, sales data from 2009 is irrelevant to your report, SQL proves advantageous. It enables you to load only the necessary set of data by specifying exact columns and rows in your SQL statement, importing them into your semantic model. SQL provides flexibility to join different tables, execute specific calculations, formulate logical statements, and filter data within your query.
In the following example, a straightforward query is demonstrated where the ID, NAME, and SALESAMOUNT are selected from the SALES table.
The SQL query initiates with a select statement, allowing you to choose the specific fields you wish to extract from your database. In this instance, the objective is to load the ID, NAME, and SALESAMOUNT columns.
SELECT ID, NAME, SALESAMOUNT FROMFROM specifies the name of the table that you want to pull the data from. In this case, it’s the SALES table. The following example is the full SQL query:
SELECT
ID, NAME, SALESAMOUNT
FROM
SALES
When using an SQL query to import data, try to avoid using the wildcard character (*) in your query. If you use the wildcard character (*) in your SELECT statement, you import all columns that you don’t need from the specified table.
The following example shows the query using the wildcard character.
SELECT *
FROM
SALES
The wildcard character (*) will import all columns within the Sales table. This method isn’t recommended because it will lead to redundant data in your semantic model, which will cause performance issues and require extra steps to normalize your data for reporting.
All queries should also have a WHERE clause. This clause will filter the rows to pick only filtered records that you want. In this example, if you want to get recent sales data after January 1st, 2020, add a WHERE clause. The evolved query would look like the following example.
SELECT
ID, NAME, SALESAMOUNT
FROM
SALES
WHERE
OrderDate >= ‘1/1/2024’
A recommended best practice is to refrain from executing such queries directly within Power BI. Instead, it is advisable to formulate queries like this within a view. A view, comparable to a table, is an object in a relational database. Views possess rows and columns, and they can incorporate nearly every operator in the SQL language. When Power BI leverages a view, it engages in query folding, a functionality of Power Query. The intricacies of query folding will be elaborated upon later, but in essence, Power Query optimizes data retrieval based on how the data will be utilized subsequently.