This project showcases a complete data engineering solution using Microsoft Azure, PySpark, and Databricks. It involves building a scalable ETL pipeline to process and transform data efficiently. The project demonstrates real-time data ingestion, transformation, and storage, leveraging cloud technologies and big data tools for end-to-end data workflow. Here we are gonna build and implement a Databricks Lakehouse platform using a medallion architecture pattern. Plus we are gonna use Azure DevOps for source control repos. All the data and codes are given here.
About the Project
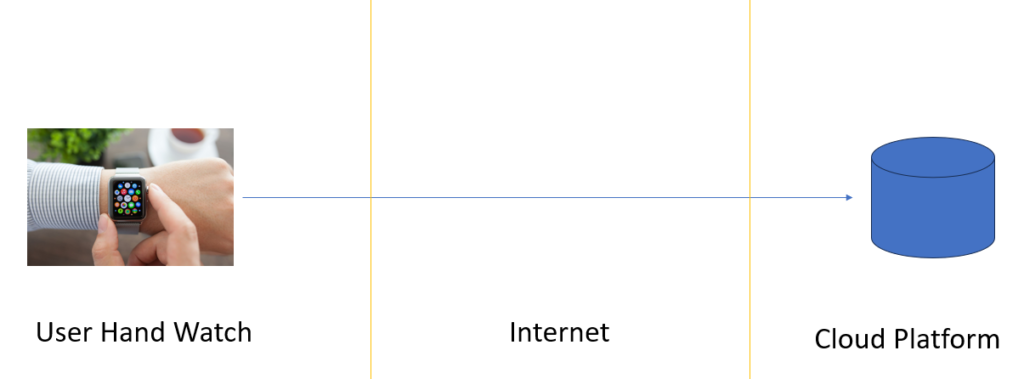
The high level view for our project is as below. Here we are gonna collect various data from smart watch and try to process it through Databricks platform, so main focus will be on Databricks Lakehouse platform and not the data ingestion part.
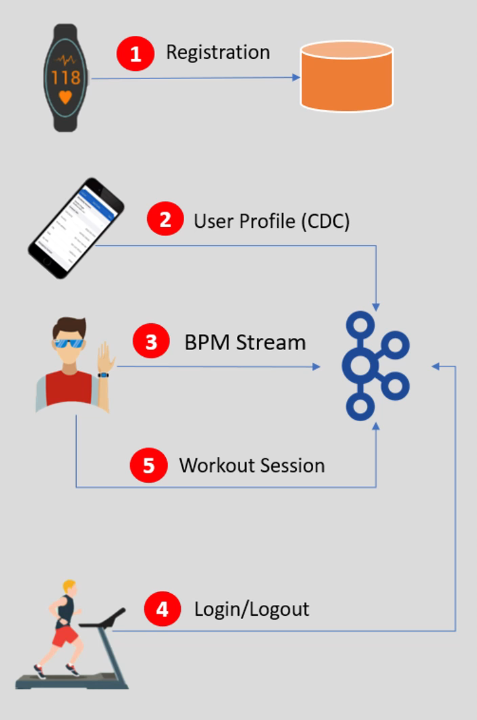
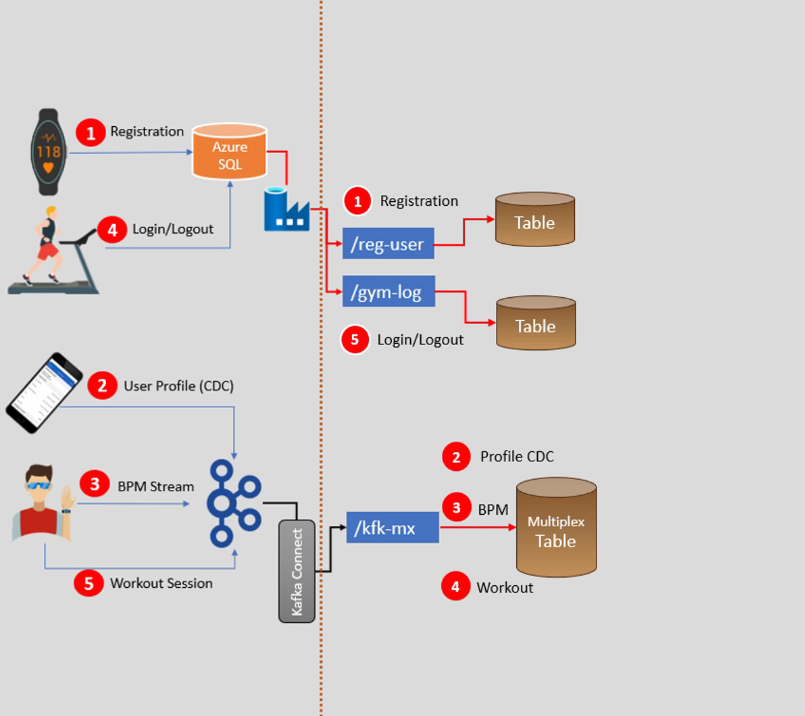
Let’s assume that a retailer sells a smart watch device to a customer, and register the device at the time of sells. The device registration is nothing but creating a User Id for that device, and linking the device hardware address with the user. So basically we capture the User Id, Device Id, Mac Address, Registration Timestamp. This data is stored in a database and our database is sits in a cloud platform. In our case we are using Microsoft Azure Cloud Platform. Great we learnt about our first dataset.
Now let’s talk about the second dataset. Your company also created a Mobile App for end users, so that user can purchase the device, complete the device registration, and download the companion mobile app. The mobile app is used to create the user profile, provide health reports, and notify him with alerts. So our second dataset is user profile data (CDC). When user creates his profile, we capture his info in Kafka Topic. However user can also update his profile information, so second dataset is a change dataset. The app generates three types of CDC (change data capture) records (new profile, profile update, profile delete) and send it to the Kafka topic.
Now let’s talk about the third kind of data, where user is wearing the device on his hand and the device continuously sends the pulse rate stream data back to the Kafka topic. We call it a BPM Stream event (beats per minutes). We also have two more datasets lets me explain them as well.
Your company is in partnership with various healthcare and fitness centers, so that the user can join one of the fitness center. You have a device identification scanner installed in these partner facilities. So when a user enters the facility you can detect the device and create a Login Event. Similarly you can detect the Logout Event as well. So our fourth dataset is login and logout event send to a Kafka topic.
Now let’s talk about the fifth and the last dataset. Your end user entering the fitness center to do some workout. Your device comes with the push button to start and stop the workout session. So we capture the start and stop events in a separate Kafka topic. And these are the five datasets we have, out of which only one goes to the cloud directly and others goes to the Kafka topic.
To implement a Lakehouse medallion architecture we collect and ingest data from the source system to your platform, and prepare the analysis data sets (workout BPM summary, gym summary) for data consumers.
Design Goles and Best Practices
- Design a secure Lakehouse platform with dev, test, and production environments
- Decouple data ingestion from data processing
- Support batch and streaming workflows
- Automate integration testing
- Automated deployment pipeline for test and production environments
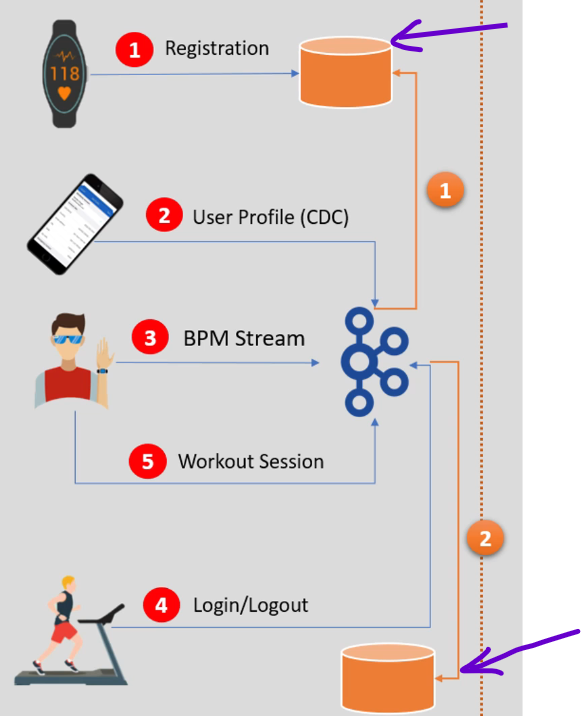
There are two operational requirements which we can ignore as it is not the job of Data Engineering team to take care. The requirements are storing the registration data, user profile data and login/logout data into the two separate databases as shown in the below image so that mobile app can use it. It is a good practice to decouple operational workload from Lakehouse. Lakehouse is mainly design to support analytical use cases, but operational use cases should be taken separately.
Storage Design
We’ll design the Lakehouse environment using the Databricks platform. Lakehouse needs storage for your data, so lets start designing our storage layer first.
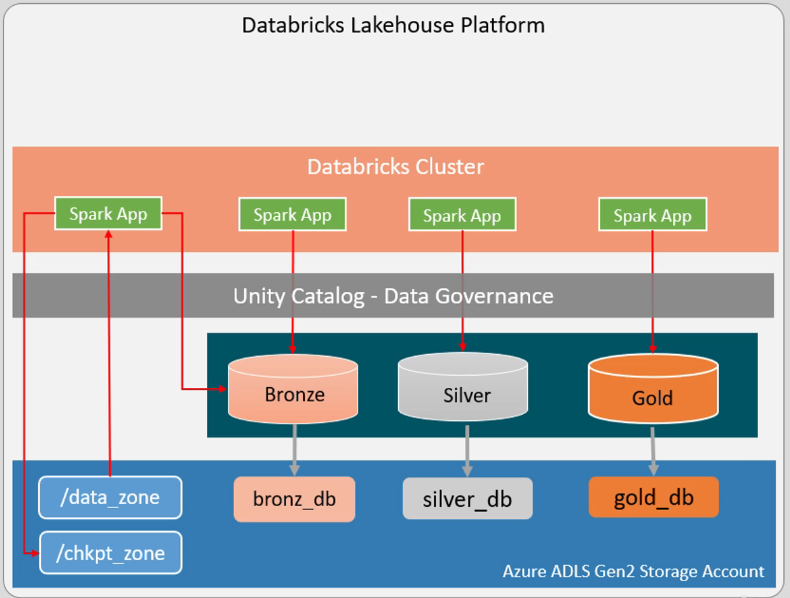
At the bottom of the lakehouse we have a storage layer. We’ll design this layer using Azure ADLS Gen2 Storage Account. So all our data and metadata will be store here in ADLS Gen2 cloud storage. In this storage we want to create three different storage containers (/sbit-metastore-root, /sbit-managed-dev, /sbit-unmanaged-dev). In the first container we’ll store all our project metadata. The second container will be used to store all the managed databases and tables (all the delta tables). And the third container is for external unmanaged datasets. This is a top level container design, we can have data directories inside it. The complete storage structure is as below.

We can follow the same structure for test and production environment, but we are keeping the single metastore for all three environment.
Now for the next layer we can create three databases on top of the bronze, silver, and gold layer storage. Here we can store data for their respective directories. My data is already encrypted by ADLS Gen2, which also protects me from hardware failures.
Next we can create the databricks cluster layer to write spark application code, which will try to access the database tables through Unity Catalog – Data Governance layer. By doing this the fined-grained access control security feature will be taken care of. So here the spark application reads the raw data from the /data_zone apply some transformation and save data to the bronze table. This spark job is also creating state information in the /chkpt_zone directory.
How do we support this usecase, you may ask. We can grant read only permission to the spark application for the /data_zone directory, then we grant the read/write permission to the bronze table. We can also grant the read/write permission to the /chkpt_zone directory. Here we stopped the direct access to the table directories, but gave the database logical layer access permission. In the second usecase, we can grant read/write permission to the bronze, silver, and gold databases. However we do not let users to access database directories, and this solves our fined-grained access control problem. One top of the Databricks cluster we can implement workspace management and cluster policies. Using this your developers and other users are assigned different roles in the workspace and given access to appropriate policies.
Decouple Data Ingestion

The next step is data ingestion. We have five datasets, device and user registration data is available in the cloud database and we want to bring that into the Lakehouse platform. The user profile CDC, BPM stream, and the workout session (start-stop events) are coming to the Kafka topic. We also want to bring those data into our Lakehouse platform. Finally the login/logout events are combined and updated into a cloud database table, so we can directly bring them from database to the Lakehouse platform. So we have two types of source systems, one is cloud database and second is Kafka topic. We assume the cloud database is a Sql-Server database in Azure cloud, it could be Azure Sql database a managed Sql server of Azure cloud. Ingesting data from Azure Sql is super simple using the Azure Data Factory service. You can create CDC factory resource or use native CDC in a dataflow, and you can ingest data into a sub-directory inside your ADLS data zone (/data_zone). You complete data ingestion work once, your data files are saved inside ADLS data zone. And this approach decouples the data ingestion part from Lakehouse platform. We are directly ingesting data into ADLS directory, and ingestion has nothing to do with Lakehouse. Your ingestion pipeline may run in batch mode or continuous mode, the rest of the data processing in the Lakehouse will have no process dependency on the ingestion.
Now lets talk about other data source, that is Kafka topic. We also want to ingest these topics into our Lakehouse. The ingestion target will be the same as Azure Sql target. Means we will ingest Kafka topic data into another ADLS directory, inside the data zone. So we will ingest all the required data into the data zone only. The data zone is our temporary landing zone for all the types of ingestion, so our ingestion pipeline and Lakehouse pipeline are not connected, they are connected via the data landing zone but remain two separate pipeline and we will have total flexibility to develop them using the most suitable tool. And we can also managed them separately.
How do you propose to ingest data from a Kafka topic to the ADLS data zone ? we can do it using multiple methods and tools. However the Kafka ADLS Gen2 sync connector will be the most suitable tool and reliable option. The connector will consume data from the Kafka topic and create a JSON file in the data zone. And that is all, your data ingestion design is done.
Design Bronze Layer
We are ingesting data into data zone’s sub-directories. User registration and login/logout are ingesting data into their respective sub-directories (/reg-user, /gym-log). All three Kafka datasets will land in a Kafka directory (/kfk-mx). Now we are ready to design our Lakehouse. We want to follow a Lakehouse medallion architecture, so the first step in implementing medallion architecture is to build your bronze layer. We can add the bronze layer tables to the sub-directories and design the dataflow. So we’ll create three tables, the first table is to store raw data about user and device registration and we will write a spark data processing pipeline to read new data from the /reg-user landing zone and load it into the bronze layer table. Similarly we need a job to read data from the /gym-log and insert it into the bronze table. The further requirement is to ingest Kafka topic data into the bronze table, however we have three datasets here. So in a typical case you would write three spark jobs to ingest the three datasets, but we can also optimized it to do with the single spark job to load all three Kafka datasets to a single table. And this approach of loading a Kafka dataset is known as creating a Kafka Multiplex Table. Kafka topic data is a key-value pair, so all the topics of Kafka have the same schema (topic name, timestamp, key, value). So it is easy and convenient to load Kafka topic into table, means we will create a one spark job and a single table to load multiple Kafka topic. This approach reduces the number of jobs and work overhead. The bronze layer is the raw data, so we do not modify or remove duplicates in the bronze layer. It is as simple as coping the data from landing zone to the bronze layer table.
Design Silver and Gold Layer
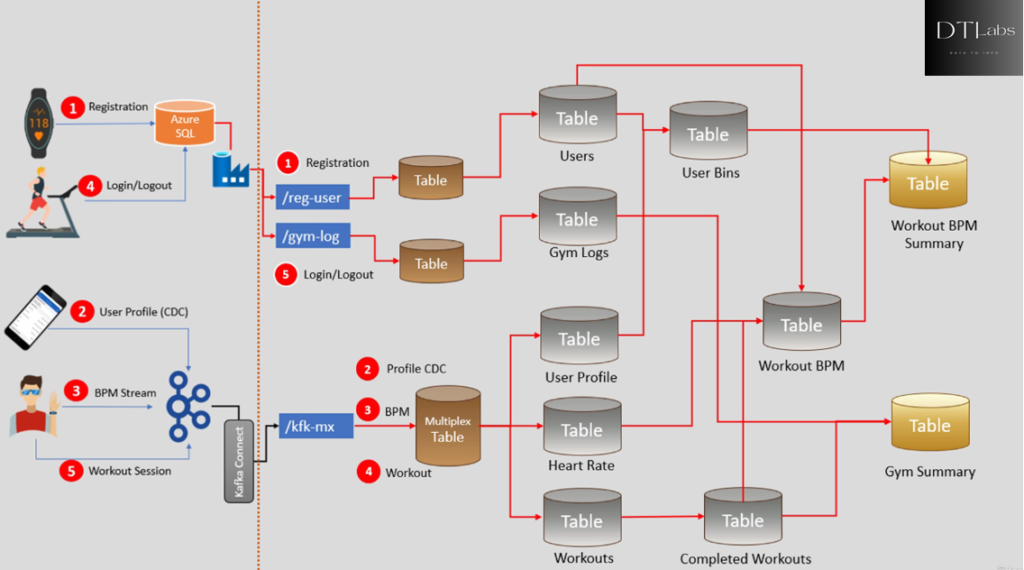
Now lets move towards completing the second and third layers of medallion architecture. The initial portion of designing the silver layer is straight forward. We want to create the five tables fir silver layer, because we have five entities in our requirement (users, gym log, user profile, heart rate, workouts). Now we also need to create five spark jobs to fill these tables, but these spark jobs should apply quality checks on the raw data, eliminate duplicates, and handle CDC scenario. So our silver layer should have good quality dataset to transfer further. So creating these five silver layer jobs are complex compared to bronze layer jobs.
For the gold layer our requirement is simple, we are expected to produce two reporting datasets. Your gold layer could be full of data nodes, so you may have to apply data modelling for gold layer, but for us we need only two reporting tables.
But the question is, how do we compute these two gold layer reports. We have our entity tables(silver layer) and we also know reporting tables(gold layer), but how we gonna transform data from entity tables to reporting tables. That’s where all your data engineering skills are required. So by looking at the diagram we can say that we also need to create some intermediate silver layer tables. We need to bucket users in age group and hence we created the use bins table. We also want to match the workout start and end to create complete workouts. And then we combine completed workouts with the heart rate to create workout BPM. We can quickly compute the reporting tables once we have these intermediate silver tables. Now we have the complete medallion architecture and design.
Setup Environment
We want to create our Lakehouse platform using Databricks cloud. We have multiple layers on this platform like storage layer on the bottom to store data, then we have unity catalog layer to manage fined-grained access control, on top of that we will have the Databricks workspace. The workspace allows us to launch our clusters and execute our applications.
We’ll use our Azure cloud platform to setup Lakehouse. Below shown the high level implementation steps to create Lakehouse infrastructure.

First create a workspace (we need premium workspace for this project). The second step is to create a storage layer for Lakehouse (ADLS Gen2 storage). It is a three step process like creating a Storage Account, create your Storage Container, and setup storage Access Connector for Databricks. The next item in our list is setup the Unity Catalog and metastore. To setup the catalog we need three things, Databricks premium workspace, path to storage container, and Resource ID of Azure Databricks access connector. And the last item is to setup your storage containers for your data and create a catalog and locations. That will be all to setup our development environment, similarly we can setup QA and Production environment too.
Create Workspace for Azure Databricks
Go to the Microsoft Azure home page and click on Azure Databricks Service. Here create a new workspace named sbit-ws and a resource group named sbit-rg. We can managed access control for your workspace from this page.
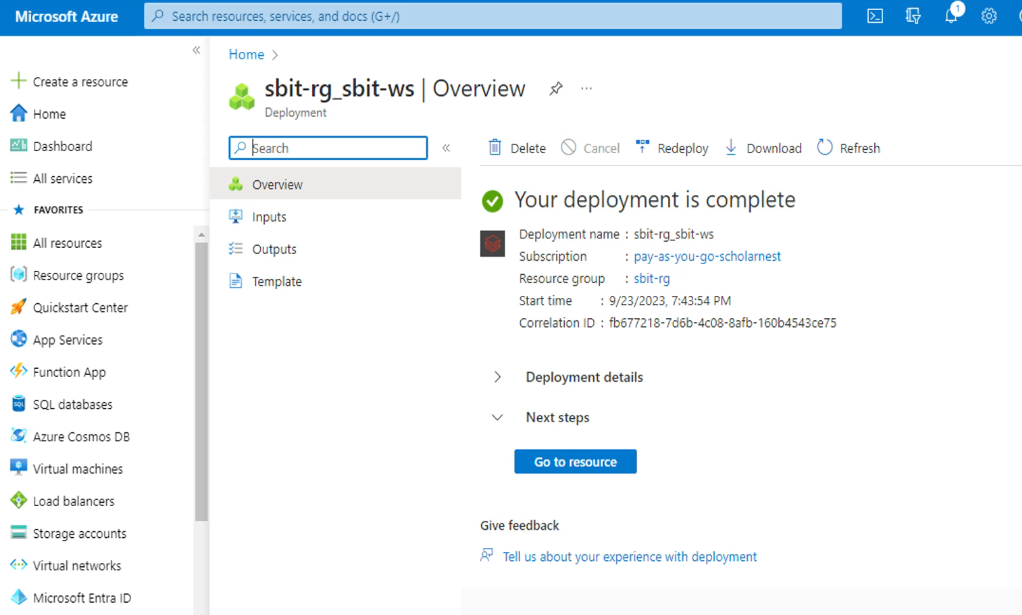
Go to resource and launch workspace.

Create Storage Layer
Creating storage layer is a three step process.
- Create a storage account
- Create your storage container
- Setup storage access connector for Databricks
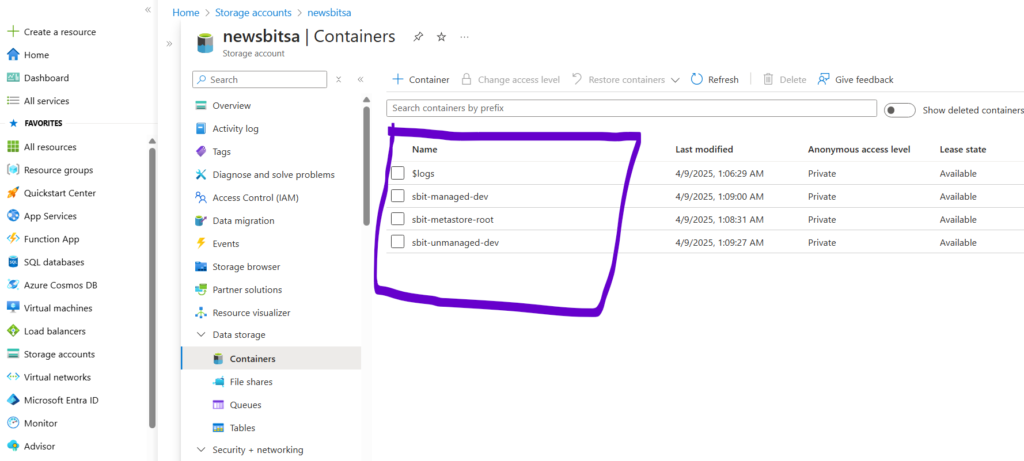
Go to the Azure portal and create new storage account. After that create storage containers inside your storage account. Create three containers as discuss earlier in design.
Now step three is to setup Databricks access connector. Click create resource option on Azure portal, and search for ‘Access Connector for Azure Databricks‘. Hit create and save (note) the resource ID somewhere, we will use it in future. The last step is to grant storage account access to the managed identity. So go back to the storage account page and select IAM access control option. Here select the ‘Storage Blob Data Contributor‘ role and hit create.
Setup Unity Catalog
Here we’ll create a unity catalog metastore. To use the unity catalog we must create the metastore. The metastore is a top level container in the unity catalog for metadata. We will need three things, Databricks premium workspace, Path to storage container, Resource ID of Azure Databricks access connector. Give name to the metastore as sbit-meta. We can create the separate groups (sbit-dev) inside the Databricks account and assign the users to it. This is assigned to the container we created earlier named sbit-metastore-root.
Create the External Location in catalog tab to manage all the managed tables (sbit-managed). This is assigned to the container we created earlier named sbit-managed-dev. We will create our catalog at this location. Once we have a catalog at this location all databases and tables in catalog will land in this location. Now create the dev catalog for development team. Once we have the catalog we can create schema or database.
Create another External Location for unmanaged data tables (data_zone). This is assigned to the container we created earlier named sbit-unmanaged-dev. We can also create separate directories inside it for storing data, name it as data directory. Plus create another sub directory for checkpoint data store named as checkpoint. Also grant the permissions to these directories as All Privileges. Now we are ready with development environment, and team can start working on the project.
Source Control Setup
Every large project must have a source control setup, it is also known as version control. Examples are GitHub, Bit Bucket, GitLab, Azure DevOps, AWS Code Commit. In our project we are gonna use Azure DevOps.
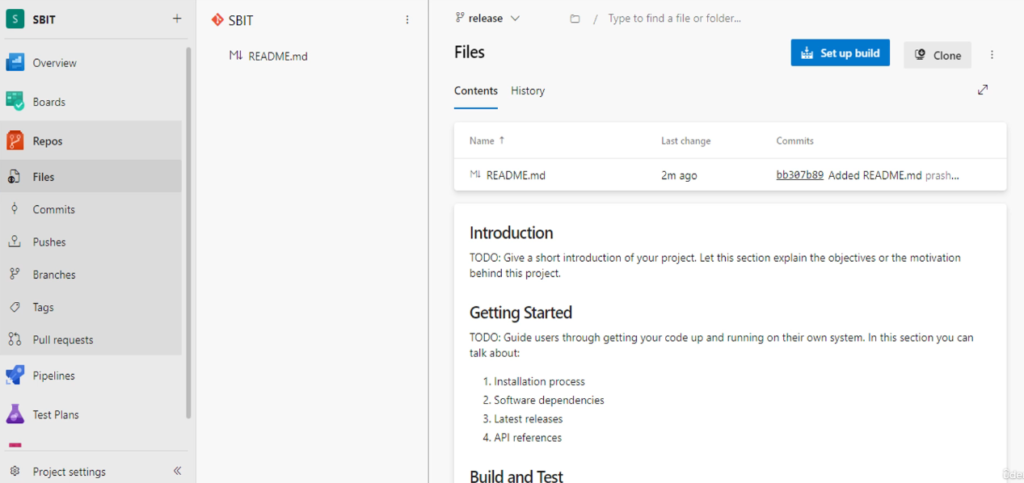
Access the Azure DevOps account and create a new organization in DevOps inside which we can create the projects. Name the project as SBIT. Here in this DevOps project we want to create a source code repository and initialize main branch. Just create a new branch based on main branch called release. A typical project may have one main branch and multiple release branches under the main branch the developers can have multiple feature branches under a release branch. That’s all about source control, now we can start coding. Before starting coding, we need to setup the QA and Production environment similar to Dev environment. Do the exact same thing so that we can transfer our releases from Dev to QA and from QA to Prod.
Start Coding
We finished designing the project and initializing the source control for the project. Now go to the Databricks home page and open development workspace sbit-ws. This workspace is unity catalog enabled, and we already have the dev catalog setup for this workspace.
Look at the design diagram we made earlier, their are so many tables (3 bronze, 8 silver, and 2 gold). So first we need to create DDL script for this project. Creating the setup script is always the first thing we do in a data engineering project. Go to the workspace and click Repos option where we connect source control system. Create the folder inside this Repos option, and name it as SBIT. Now right click the SBIT folder and create a new repo. Enter the details like HTTPS URL, and Git credentials Token to create the repo. By default we are in the main branch, we will create the feature branch and then start creating notebooks inside the feature branch. Go to the Git operation UI by right clicking on repo. Create a new branch here named as initial-feature based on release branch. Now hit the pull button to successfully pull the changes from source control (just for checking). I know there is no data yet to pull. Now just come back to the Databricks workspace where your current branch is initial-feature, here we have to create a notebook and start coding. Right click SBIT repository and create a notebook, name this notebook as 02-setup. We will create our setup script and setup function in this notebook. This code is to setup our databases and tables. These are bunch of DDLs wrapped inside python code. All the codes are given here.
Create another notebook in the same repository name as 01-config and write the configuration code here.

Go to the Git operation UI and commit & push the changes so far so that it will reflect merged changes on feature branch. Once the every code is merged we can start the CI/CD pipeline and deploy the code in the QA environment.
A Typical Development Activity
- Clone the project from the source control
- Create your feature branch
- Write code, unit test, and commit
- Raise a pull request to merge your feature branch with main code
Test the Code
We created our setup script till now, here on we need to see unit testing approach. Go to the Databricks workspace repos SBIT. We will create the single database in our project for simplicity, but creating multiple databases is recommended when you have multiple tables in each layers. In the 01-config notebook we created the variables for data directory locations and databases so that everything will be centralize and we do not have to hardcode any values. In the 02-setup notebook we are calling the config notebook class and creating databases and tables. Here we created each python function for each table. We have also created the validation function code for validating newly created tables. The cleanup function is used to drop the database, tables and delete all the intermediate data directories. This is all about the initial setup code. Note that we have to create three databases for each bronze, silver and gold layers. But for simplicity in our project we are creating only one database for all three layers.
To execute this code we need a cluster. So go to the compute menu and create a new single node cluster. Just run the 02-setup notebook to test the code.
Load Historical Data
In a typical project you may need a one time data load. For example you may have some historical data, you may also have some fixed reporting lookup data. You want to load this dataset in your platform before you go live, and such datasets are loaded only once. So we need to create one module to create historical data.
Go to your Databricks development environment workspace, where SBIT repository stored in repos. Create a new notebook here with name as 03-history-loader. We are creating all the historical data load functions here. Ingest the data from on-premise to the cloud storage and write the history loader function.
Ingest Into Bronze Layer
To ingest data into bronze layer tables from landing zone directories can be done using one of the two approaches, first is Batch processing, second is Stream processing. We are gonna use stream processing approach. We will write some functions to move data from landing zone to the bronze layer. Go to the Databricks workspace SBIT repo, and add a new notebook. Give it a name as 04-bronze.
As usual we call 01-config notebook first here on the top. All the bronze layer ingestion function are here in this notebook. Here we are calling spark readStream to read the data in the streaming mode and calling writeStream to write data to a table. We are reading data using spark autoloader.
Process the Silver Layer
We coded our bronze layer, now its time to code silver layer processing. The three bronze layer table is input for the silver layer table.
Go to the Databricks workspace SBIT repo, and add a new notebook. Give it a name as 05-silver. As usual we import 01-config notebook on the top, then start coding. Here we will write eight functions for each eight silver tables. We are implementing spark streaming process with steps like read new data from bronze table, remove duplicates, transform the raw data, merge the transform data to the silver table.
If we are getting multiple updates for the same records in the same batch, we must apply changes in the order of arrival. That’s what we are doing here, since spark streaming is a micro batch.
Implementing Gold Layer
We coded our silver layer process, its time to code gold layer. We only have two gold layer tables as shown in the diagram earlier. These gold layer tables are based on the two silver layer tables. People usually create the view for gold layer tables and expose it for gold layer reporting, because it is not always necessary. In our project, we are creating two gold layer tables instead of views.
Go to the Databricks workspace SBIT repo, and add a new notebook. Give it a name as 06-gold. Write all the functions and unit test validations here to bring data from silver layer to gold.
Creating a Run Script
We have finished with the task of ingesting data into the bronze layer and processing data from silver and gold layers. So the core of our project development is complete. Now its time to plan how we want to run our jobs. If we look at the complete data flow diagram from earlier, we have three bronze layer jobs(target tables). However we have created one single consumption method in the bronze layer, this single consumption triggers all three pipelines and ingest data into all three tables. So for bronze layer I must call a single consumption method. Similarly we have created the single Upsert method for silver layer, and single Upsert method for the gold layer. The point is straight forward, we will call three methods to execute all the jobs shown in that diagram. One for bronze layer, another one for silver, and last one for gold layer. Now lets create one standard run notebook and code what we just discussed.
Go to the Databricks workspace SBIT repo, and add a new notebook. Give it a name as 07-run. We have three notebooks for bronze silver and gold layers, these notebooks define bronze, silver, and gold classes and all the three methods take three parameters (Environment, Run type, Processing time). So the first thing to code in this 07-run notebook is to define the first three parameters. The next code is to extract the parameter values into the python variables and printing the runtime message on the console. Before run the jobs, lets write some performance tuning configurations in this notebook to optimize the code performance. The code run flow is such that, we first run the setup module 02-setup, then I will import history loader module 03-history-loader. Next step is to create setup and history-loader objects and run it. However these two must only run once, for this we can write the code to check if database is already created or not. The next step is to run bronze (04-bronze), silver (05-silver), and gold (06-gold) methods by importing it in this notebook. Plus we have to create the objects for all the three layers. That’s all now we can trigger the bronze (consume), silver (upsert) and gold (upsert) layer methods. We created the run notebook to start all our jobs. But how do we use the notebook, well it depends on our requirements. Let’s assume we want to run all the jobs in batch mode every hour, so we can create the Databricks workflow job to schedule this notebook every hour. Now let’s assume we want it to run it as streaming pipeline, so we can create the Databricks workflow job to trigger this notebook only once. That’s all, once trigger all the jobs will keep running. The point is straight, we have a 07-run notebook and now we are ready to create the workflow job using the notebook as per our requirements.
Prepare Integration Testing
Now lets talk about our testing approach. In our dataflow diagram earlier that we saw, we have written the code using the stream processing approach, but we can run the code in batch or streaming mode. So we want to create two test cases. One for batch mode and another for streaming mode. However testing requires testing test data. We have five inputs for our system, so we need five input datasets for each input type. We need some user registrations, some set of user profile updates and bunch of BPM stream records. Similarly we need some workout sessions and some login/logout events. Preparing test data is a challenging task. We will need payloads to trigger our workflow jobs, and test the expected results. We should test at least two iterations of input, means at least two payloads are required to see how the system behave with an incremental load. Once we have the test data, the next thing is to automate the integration testing. All the payloads with numbering are already given in GitHub link above.
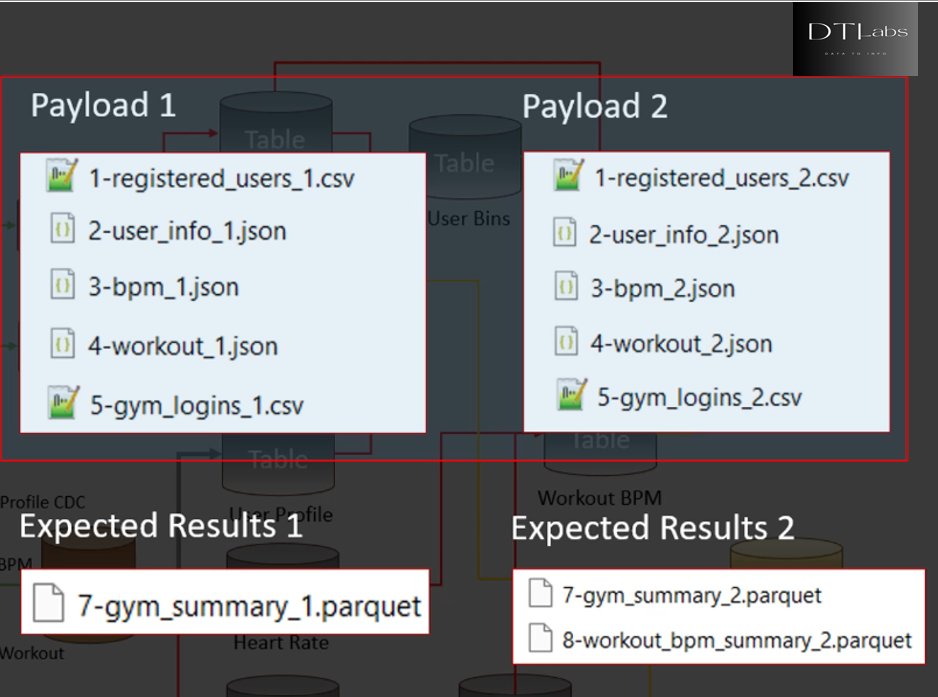
So we copy the first payload into the landing zone, and trigger our workflow job. Our workflow job will process all the records from the first payload and validate the results. We have also prepared the two sets of gold layer reports to compare the outputs. After the first payload and job run we will compare the gold layer table with expected result/outcome in the 7-gym_summary_1 file. We will pass the first iteration test if the results are as expected, then we will copy the second payload into the landing zone and rerun the job with second set of inputs and verify the results. And that’s how we can do complete end-to-end integration testing. The point is straight, we should test at least two iterations of input. Preparing test data files is one of the most challenging data activity. Once we have the test data, the next step is automate the integration testing.
In our example, we must create three notebooks to automate our tests (producer, batch test, streaming test). The producer notebook will copy the first payload to the landing zone. Batch test notebook will call the Run notebook to run in batch mode. Once the batch mode job is complete we will run our validation functions to verify the results. Then we can again call the 10-producer notebook for the second payload, and finally call the batch test for running the second iteration. The same thing is done with the streaming test notebook.
All the notebook codes are given here. In the producer notebook we will write the producer class, in which some functions are defined like user registration, profile CDC, workout and many. In the batch test notebook, we code environment variables, and call payload validations for automate batch integration testing. In the streaming mode integration testing automation, we write code in streaming test notebook.
Implementing CI/CD Pipeline
It’s time to implement CI/CD pipeline for the project. CI/CD automation is a complex thing to implement, so it is usually done by DevOps experts for our projects. However as data engineers, we need to collaborate with DevOps team to implement the same. Below is the diagram that represents a typical CI/CD pipeline.
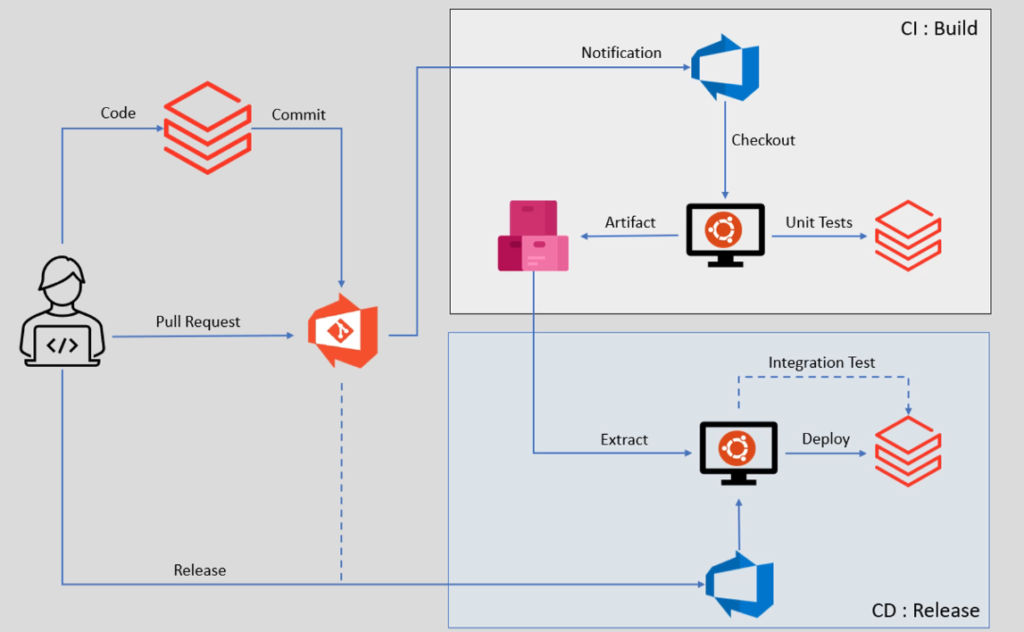
A typical project may have two pipelines, one is CI (continuous integration) we call it as Build, and other is CD (continuous deployment) we call it as Release. Lets assume we are the developers, for Databricks data engineering projects we connect the Databricks workspace and write our code in the workspace environment. You can connect your workspace with code repository of your choice. For our project we connect our workspace with Azure Git Repos, it is part of the Azure DevOps platform.
A typical project will have Master(Main), Release, Dev, and multiple Feature branches in our repos. Lets assume we write code in Databricks workspace and create notebooks and python files. Once we are done we will commit these notebooks in our feature branch. The commit goes to your git repository, the git repository will automatically notify Azure DevOps pipeline. he Azure DevOps will read the notification and start taking actions, The first action is to launch an Ubuntu virtual machine, we call it an Agent. The agent is necessary to run your pipeline code, so DevOps will start the agent machine. Then on Ubuntu agent your build pipeline code will starts running. The pipeline code does many things such as installing python, pyTest, and Databricks connector and preparing the machine to successfully run pipeline. However the main objective of the build pipeline is to checkout the latest code from the GitHub repository, and that’s what the diagram also shows. The next step is to connect with the Databricks environment and execute the unit test cases. We have two approaches to run unit test cases, one is running locally on the agent, other is running remotely on a Databricks environment using Databricks connector. We will use second one.
So lets assume your test cases pass, the pipeline will take all your code. Prepare a deployable artifact, and save it to a artifact repository. Preparing an artifact means as simple as creating a zip file for all your notebooks, also creating python bins and keeping it ready for installation on target cluster. That is all about the CI pipeline, so build pipeline will run on every branch as soon as we have new code commit on the branch.
Now lets talk about the CD pipeline, the CD or release pipeline has two essential facts, it runs on release and main branch only not every branch, plus it often triggered manually. Now lets try to understand the workflow, the project team finishes all the development and merges all the feature branches into a common Dev branch. Once your dev branch is ready for deployment someone from the team will raise the pull request to merge the dev branch into a release branch. The pull request will send automatic notification to the build pipeline. The build pipeline will run and prepare the artifact for the release branch. Now someone from your team will manually trigger the release pipeline. You can automate the trigger, so that your release pipeline can start as soon as your artifact is ready. The dotted line shown in the diagram is optional. Lets assume you create your release pipeline manually, the pipeline will create an agent machine. The next step is to extract the latest artifact from the repository, and bring it to the agent machine. Finally the pipeline will run the code to deploy your artifact in target environment.
Build Pipeline
A build pipeline often requires creating a yaml file. The yaml file defines all the steps for build pipeline and may contain code and scripts. So the first step for creating a build pipeline is to create a yaml file. Go to Azure DevOps portal and SBIT project, go to the repos and create a new branch where we will create the file. Name the new branch as feature-build based on release branch. Create a new file with name as azure_build_pipeline.yaml in the feature-build branch, and write the yaml file content here and commit it. Plus we need to merge it with release branch using pull request. The next step is to create the new pipeline. It should automatically run when we commit the release branch or make the pull request to the release branch.
Release Pipeline
Go to Azure DevOps portal and SBIT project, choose the Releases option from menu, and hit the new release pipeline button. We will use empty job template here. Now add the artifact with build pipeline as source. Means it will take the artifacts from the build pipeline. Now we can define stages and multiple tasks inside stage. Also give name to the pipeline as SBIT Deploy Pipeline. So the build pipeline is automated and release pipeline is manual. So these deployment pipelines uses bash scripts to deploy data and folders from Databricks dev workspace to QA workspace as we created the two workspaces in Databricks environment and then from QA to Prod. That’s all we have implemented the Databricks Lakehouse Architecture using medallion pattern. All the codes are given here. Please comment down below if you like this content.